尝试理解Roy Fielding dissertation

REST是一种架构,URI、HTTP、WWW都是在这个架构思想的指导下研发的。

Representational State Transfer这个词组非常晦涩难懂,直接翻译的话,“表现层状态转移”,根本不知道在说什么。

看了一遍论文有了大概理解。那就是一个系统有很多状态,状态之间可以发生转换(virtual “state-machine”),同时用户可以观察到这些状态在表现层的形态。

在我们最常见的网页浏览情景下,其实REST描述的就是用户在浏览器里点击超链接的过程。

当你进入一个网站的首页,这是初始状态,点击进入一个页面,这就进入了另一个状态。这些状态的背后,是客户端和服务器内部状态的转换,同时用户也能观察到这些状态的转换。

使用了客户端连接到服务器,这体现了REST的C/S;首次登录没有建立登录状态,服务器不认识你,登录完浏览器会存储cookie或token等身份信息,如果你丢掉了本地的身份信息(比如使用无痕模式)再来访问,服务器还是不认识你,这体现了REST的Stateless;网站有更新之后,可能出现浏览器刷新但实际没有再次请求,直接使用本地缓存的情况,这就是REST的Cache。

C/S、Stateless、Cache都是REST架构提出的constraint。constraints集合形成了架构风格。(dissertation 5.1.2-5.1.4)

RESTful指的是设计和实现符合REST这种架构。

REST架构风格还包括:统一的接口,分层的系统,Code-On-Demand(客户端按需下载代码增强系统能力,optional)

再次强调接口的重要性

Uniform interfaces

Perhaps one of the most fundamental aspects of RESTful systems is the uniform interface, a way to decouple and simplify application architecture so that each component can develop and change on its own. There are four, further constraints involved in uniform interfaces:

  • Requests must contain resource identifiers. As an example, a URI can be contained in a request to enable the resource to be identified. Note that, conceptually, resources are distinct from the results that are returned to a client. For example, no matter what the server’s own method of storing data is, the data sent in answer to a request could be sent as anything from XML to HTML or even JSON.
  • Representations can manipulate resources. Clients might hold a representation of a specific resource – and this could contain metadata. This information is sufficient for the client to be able to change the resource, or to delete the resource.
  • Messages are self-descriptive. Every message sent under a RESTful architecture will contain sufficient information for the recipient to be able to process the message – as an example, a message can use a media type to specify which parser should be used.
  • HATEOAS. Short for “hypermedia as the engine of the application state”, this principle is just like a human having access to the home page of a specific website. The client should then have the option to make use of links provided by the server so that it can automatically understand which activities and resources it will require.

重学操作系统3

lab3 pgtbl的难度陡增。而且发现一个特点,其实只看实验文档所说的章节往往是不够的,而且越来越不够。前面的章节要好好复习,后面的章节可能也要看看。

第一题依然是热身难度,但是第二题开始完全不知道怎么下手,盲点过多。

懵逼了一整天,参考了其他人的经验才调好了第二题的细节。只好先放下,先把xv6那本书再看一遍。在理解的基础上,再做一遍。

不能急,慢慢来。

===

复习ing,TBC

重学操作系统2

进入lab2 syscall,这次的任务是写两个系统调用。

第一个是trace,功能是把程序执行过程中的系统调用都展示出来。trace shell命令已经写好了,在user/trace.c里面,看看就好,不用修改这个文件。

首先,老老实实按照lab的指示,阅读xv6 book的第二章,还有第四章的4.3和4.4 。这里面一个重点是kernel/proc.h里面的proc结构体,其实它就是xv6的进程控制块(PCB Process Control Block,当年在书上学来学去很多遍,不如在代码见识一次)。你需要扩展它,增加一个值用来记录trace mask。你需要的很多信息也都在这个结构体里面。

照葫芦画瓢,在其他syscall的定义文件里,Makefile、kernel/syscall.h、kernel/syscall.c、user/user.h、user/usys.pl里面统统加上trace相关的声明,照着每个文件的格式写就行。

然后功能分布在kernel/proc.c, kernel/syscall.c, kernel/sysproc.c里面。proc.c主要是把trace mask从父进程拷贝到子进程。syscall.c负责打印trace信息。sysproc.c则包含了sys_trace的系统调用本体,逻辑很简单,就是把参数存到proc结构体新增的成员变量里。

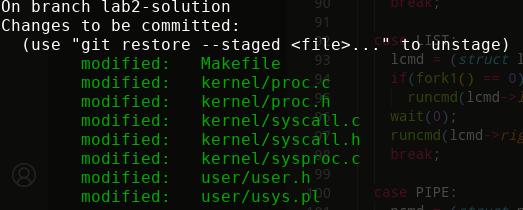
改动的文件
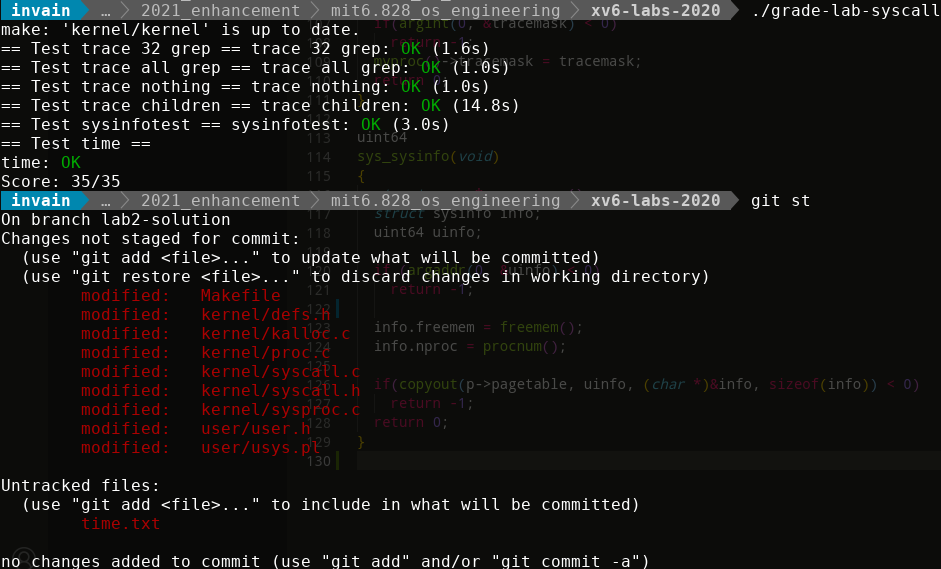
auto grader通过

也许你需要这个表

char* syscall_names[] = {
  "xxx",
  "fork",
  "exit",
  "wait",
  "pipe",
  "read",
  "kill",
  "exec",
  "fstat",
  "chdir",
  "dup",
  "getpid",
  "sbrk",
  "sleep",
  "uptime",
  "open",
  "write",
  "mknod",
  "unlink",
  "link",
  "mkdir",
  "close",
  "trace",
  "sysinfo",
};

第二个是sysinfo。还是要注意在各个头文件里加好函数声明。在kernel/kalloc.c里定义一个空闲内存的统计函数,很简单,就是遍历那个全局链表kmem,统计个数,然后乘以PGSIZE。在kernel/proc.c里定义一个统计进程状态不等于UNUSED的进程个数,遍历全局变量proc数组一个个判断、累加。至于把struct sysinfo从内核拷贝到用户空间,直接在代码库里搜索copyout有大量范例,照抄即可,easy peasy。

重学操作系统

最早国产的操作系统课基本是原理课,很少有上手做点东西的机会,当年学完还是很遗憾的。后来国内的课程发展很快,比如清华大学哈工大的课都有设计比较好的实验,但是他们的课都有莫名其妙的门槛,比如学堂在线的实验环境引导已经实质上失效了(是mooc课程没有即时更新,其实文档和配套代码都很全),网易云课堂没有self paced模式,只能等下一次开课。

还好顺藤摸瓜找到了MIT操作系统课6.S081的页面,发现了宝藏。最新的2020年教学录像、课件、lab代码一应俱全,甚至还有自助判分工具。

做了一下lab1 util,难度适中,上手比较轻松。那本xv6的手册写的极其精练,一下子理清了很多以前模糊的概念。宝藏课程宝藏课程。

MIT操作系统课lab的自动评分脚本

MIT lab的引导写的非常详尽,一步一步照着做就行。不过有几道题的细节还是有点麻烦。比如用CSP(就是Golang用的并发模型,你赚到了!)来写的primes,如果不注意在主进程和子进程把没用到pipe的读、写fd关闭,你先遇到的并不是xv6的fd数量限制,而是子进程读取pipe时会阻塞,因为写的那端没关闭,数据已经读完了但会一直在等,程序就不往下跑了。xargs也有个小细节,就是执行exec调用,argv数组要以命令本身开始,用0结束(也就是NULL),see example

总之真的是比较愉快的体验。这个时代资源随手可得,现在的孩子太幸福了。

Sentry onpremise迁移踩坑

其实最想要的是保留project配置,这样客户端的DSN配置统统不用改,报错数据倒是可以不要。

有文章已经给出了配置迁移教程:https://medium.com/@avigny/sentry-on-premise-migration-dc0e42f85af4

不过我在过程中遇到了奇怪的错误

root@b06d49e21a01:/# sentry import data/files/sentry_export.json                               [832/1970]
00:27:04 [WARNING] sentry.utils.geo: settings.GEOIP_PATH_MMDB not configured.
/usr/local/lib/python2.7/site-packages/cryptography/__init__.py:39: CryptographyDeprecationWarning: Pytho
n 2 is no longer supported by the Python core team. Support for it is now deprecated in cryptography, and
 will be removed in a future release.
  CryptographyDeprecationWarning,
00:27:08 [INFO] sentry.plugins.github: apps-not-configured
Traceback (most recent call last):
  File "/usr/local/bin/sentry", line 8, in <module>
    sys.exit(main())
  File "/usr/local/lib/python2.7/site-packages/sentry/runner/__init__.py", line 166, in main
    cli(prog_name=get_prog(), obj={}, max_content_width=100)
  File "/usr/local/lib/python2.7/site-packages/click/core.py", line 722, in __call__
    return self.main(*args, **kwargs)
  File "/usr/local/lib/python2.7/site-packages/click/core.py", line 697, in main
    rv = self.invoke(ctx)
  File "/usr/local/lib/python2.7/site-packages/click/core.py", line 1066, in invoke
    return _process_result(sub_ctx.command.invoke(sub_ctx))
  File "/usr/local/lib/python2.7/site-packages/click/core.py", line 895, in invoke
    return ctx.invoke(self.callback, **ctx.params)
  File "/usr/local/lib/python2.7/site-packages/click/core.py", line 535, in invoke
    return callback(*args, **kwargs)
  File "/usr/local/lib/python2.7/site-packages/click/decorators.py", line 17, in new_func
    return f(get_current_context(), *args, **kwargs)
  File "/usr/local/lib/python2.7/site-packages/sentry/runner/decorators.py", line 30, in inner
    return ctx.invoke(f, *args, **kwargs)
  File "/usr/local/lib/python2.7/site-packages/click/core.py", line 535, in invoke
    return callback(*args, **kwargs)
  File "/usr/local/lib/python2.7/site-packages/sentry/runner/commands/backup.py", line 15, in import_
    for obj in serializers.deserialize("json", src, stream=True, use_natural_keys=True):
  File "/usr/local/lib/python2.7/site-packages/django/core/serializers/json.py", line 88, in Deserializer
    six.reraise(DeserializationError, DeserializationError(e), sys.exc_info()[2])
  File "/usr/local/lib/python2.7/site-packages/django/core/serializers/json.py", line 81, in Deserializer
    objects = json.loads(stream_or_string)
  File "/usr/local/lib/python2.7/json/__init__.py", line 339, in loads
    return _default_decoder.decode(s)
  File "/usr/local/lib/python2.7/json/decoder.py", line 367, in decode
    raise ValueError(errmsg("Extra data", s, end, len(s)))
django.core.serializers.base.DeserializationError: Extra data: line 1 column 2 - line 9340 column 1 (char
 1 - 184186)
Exception in thread raven-sentry.BackgroundWorker (most likely raised during interpreter shutdown)

仔细看原来是导出的sentry_export.json文件混入了其他的stdout内容:

07:14:23 [WARNING] sentry.utils.geo: settings.GEOIP_PATH_MMDB not configured.
07:14:55 [INFO] sentry.plugins.github: apps-not-configured
>> Beginning export
...
>> Skipping model <Broadcast>
>> Skipping model <CommitAuthor>
>> Skipping model <FileBlob>
>> Skipping model <File>
>> Skipping model <FileBlobIndex>
>> Skipping model <DeletedOrganization>
>> Skipping model <DeletedProject>
>> Skipping model <DeletedTeam>
...

把这些多余的行删除后,才成为合法JSON数据。

然而继续执行又遇到了sql错误:

  File "/usr/local/lib/python2.7/site-packages/click/core.py", line 722, in __call__          [633/2067]
    return self.main(*args, **kwargs)
  File "/usr/local/lib/python2.7/site-packages/click/core.py", line 697, in main
    rv = self.invoke(ctx)
  File "/usr/local/lib/python2.7/site-packages/click/core.py", line 1066, in invoke
    return _process_result(sub_ctx.command.invoke(sub_ctx))
  File "/usr/local/lib/python2.7/site-packages/click/core.py", line 895, in invoke
    return ctx.invoke(self.callback, **ctx.params)
  File "/usr/local/lib/python2.7/site-packages/click/core.py", line 535, in invoke
    return callback(*args, **kwargs)
  File "/usr/local/lib/python2.7/site-packages/click/decorators.py", line 17, in new_func
    return f(get_current_context(), *args, **kwargs)
  File "/usr/local/lib/python2.7/site-packages/sentry/runner/decorators.py", line 30, in inner
    return ctx.invoke(f, *args, **kwargs)
  File "/usr/local/lib/python2.7/site-packages/click/core.py", line 535, in invoke
    return callback(*args, **kwargs)
  File "/usr/local/lib/python2.7/site-packages/sentry/runner/commands/backup.py", line 16, in import_
    obj.save()
  File "/usr/local/lib/python2.7/site-packages/django/core/serializers/base.py", line 205, in save
    models.Model.save_base(self.object, using=using, raw=True, **kwargs)
  File "/usr/local/lib/python2.7/site-packages/django/db/models/base.py", line 838, in save_base
    updated = self._save_table(raw, cls, force_insert, force_update, using, update_fields)
  File "/usr/local/lib/python2.7/site-packages/django/db/models/base.py", line 905, in _save_table
    forced_update)
  File "/usr/local/lib/python2.7/site-packages/django/db/models/base.py", line 955, in _do_update
    return filtered._update(values) > 0
  File "/usr/local/lib/python2.7/site-packages/django/db/models/query.py", line 667, in _update
    return query.get_compiler(self.db).execute_sql(CURSOR)
  File "/usr/local/lib/python2.7/site-packages/django/db/models/sql/compiler.py", line 1204, in execute_
sql
    cursor = super(SQLUpdateCompiler, self).execute_sql(result_type)
  File "/usr/local/lib/python2.7/site-packages/django/db/models/sql/compiler.py", line 899, in execute_s
ql
    raise original_exception
django.db.utils.IntegrityError: UniqueViolation('duplicate key value violates unique constraint "django_
content_type_app_label_model_76bd3d3b_uniq"\nDETAIL:  Key (app_label, model)=(sentry, groupresolution) a
lready exists.\n',)
SQL: UPDATE "django_content_type" SET "app_label" = %s, "model" = %s WHERE "django_content_type"."id" = 
%s

我一开始想删JSON里的数据,比如(sentry, groupresolution),搜索groupresolution可以找到对应的对象。可是删了几十条,还是报错,没见有结束的迹象……

换个思路,我把新sentry的数据库清了吧。先找到postgresql对应的容器id,docker exec -it <container_id> bash进入,psql -U postgres到数据库shell,然后`TRUNCATE TABLE django_content_type`

又报错:

postgres=# TRUNCATE TABLE django_content_type;
ERROR:  cannot truncate a table referenced in a foreign key constraint
DETAIL:  Table "django_admin_log" references "django_content_type".
HINT:  Truncate table "django_admin_log" at the same time, or use TRUNCATE ... CASCADE.

外键约束。。。那没办法了,直接TRUNCATE TABLE django_content_type CASCADE;

NOTICE:  truncate cascades to table "django_admin_log"
NOTICE:  truncate cascades to table "auth_permission"
NOTICE:  truncate cascades to table "auth_group_permissions"
TRUNCATE TABLE

再次导入,成功了。
Manjaro Lysia 20.0.3 new swapfile

If you generate a new swapfile, it usually will get a new uuid. But /boot/grub/grub.cfg will not be updated automatically.

So next time you boot, error like this will occur:

ERROR: resume: hibernation device ‘7a5aa742-6133-41bd-8dc5-d72d4790d364’ not found

In this case you will have to wait a long time to get into GUI or not able to login at all.

What you should do is to edit /etc/default/grub, change GRUB_CMDLINE_LINUX_DEFAULT="quiet resume=UUID=<your new swap UUID>", and then run sudo update-grub to update /boot/grub/grub.cfg.

Check if resume=UUID=<new swap UUID> in /boot/grub/grub.cfg are set correctly.

You should also check swap UUID in /etc/fstab.

Use sudo blkid to find UUID of your devices.

网络变化,docker网桥与网卡的新网段冲突

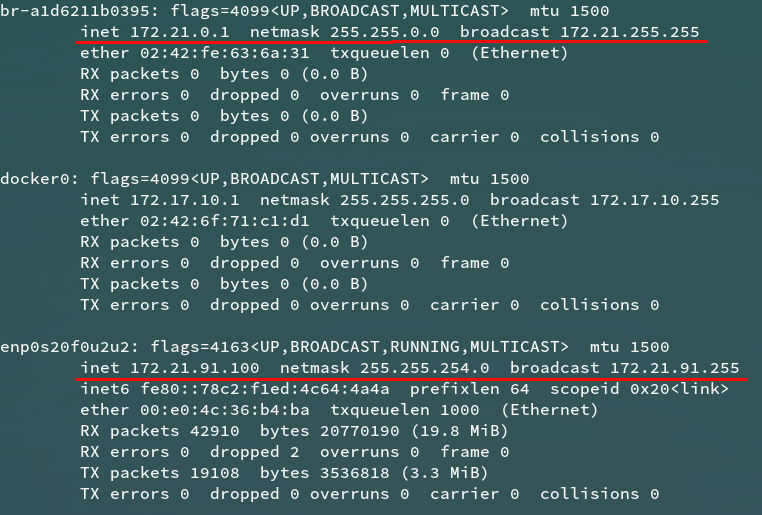
搬新办公室之后,网卡DHCP拿到的IP发生了变化,导致一个自动生成的网桥与网卡网段有冲突,结果互联网可以上,而内网其他服务器都不能访问,每次重启电脑都要手动把网桥禁用才能正常访问内网开发服务器。

出现这种情况的原因是在老的网络环境使用过docker-compose创建了网络,在新的网络环境里,老的docker网络并不会自动重新生成网段来避免网络冲突。

使用docker network rm a1d6211b0395把冲突的网络删除,让docker-compose未来启动时自动重建网络即可。

a curious case of Flask-SocketIO

As a fullstack developer (do it all alone coding monkey), one day you are assigned with a task that requires realtime communication between browser and server.

So you typed ‘flask websocket’ in Google. The first page was filled with Flask-SocketIO. So you pip installed it and inside create_app, you did what the documentation said:

socketio.init_app(app)

then you run socketio.run() and open the example html came along with the chat demo.

To your surprise, the browser connected and was sending a ping in one second interval. But the server seemed like it was not receiving nor sending anything after WebSocket connection was established.

You spent several hours trying to find out why. Including all sorts of debug parameters:

socketio.init_app(app, engineio_logger=True)

and

socketio.run(
    app,
    host='0.0.0.0',
    port=5000,
    debug=True,
    use_reloader=True,
    log_output=True
)

But to no avail.

All of a sudden, you remembered that sometimes plugins do interfere with one another. So you moved your socketio.init_app(app) down to the bottom of the blob of ‘init_app’ from many many plugins.

And then, Flask-SocketIO started to spew ‘pongs’ in one second interval like they said in the demo.

You have no idea why but it worked.

FML

nginx sticky session

Sticky session,一般翻译作会话保持,其实就是说负载均衡能做到这一点:一个用户第一次访问服务,可能是随机分配的一台upstream服务器提供服务,而这个用户的后续请求都发往第一次服务的这台机器。这样做有很多好处,比如可以提高用户数据的缓存命中率、数据一致性更容易保证等等。

Nginx本身就有一些会话保持的方法,比如ip_hash,根据请求的ip地址来哈希分配。但有些情况ip_hash是失效的,比如我们使用公司的网络,出口ip可能全都一样,这样我们访问一个外部服务其实全哈希到同一台服务器,直接失去了负载均衡的意义。Nginx Plus也有这个功能,看起来很美,唯一缺点是花钱。也有免费的sticky modulesticky module ng,问题是Nginx要重新编译,不太方便,也可能是一些新的大坑,时间黑洞。

其实我们用各种linux发行版维护的免费版Nginx配合上游服务器也能实现同样的功能。

原理很简单:应用服务器在用户请求里写入一个约定好的cookie,带上服务器的身份信息,比如主机名。Nginx先配置好{身份信息:地址}的映射关系,拿到请求后,在转发前提取此cookie,根据身份信息转发对应的upstream。

假设我们有两台应用服务器:node1, node2。cookie长这样 Name: AUTH_SESSION_ID, Value: a2c1dac1-5b50-4d1a-ba8f-f838222bd176.node1,其中node1指示了cookie来自哪台主机。这是Keycloak的cookie格式,我复用一下,其实你完全可以自己定义一种,就免了下面的正则表达式提取。

Nginx配置文件

http {
    map $cookie_AUTH_SESSION_ID $sticky_host {
        default default_upstream;
        ~^[^\.]*\.(?<node>.*) $node;
    }

    upstream node1 {
            server 4.3.2.1:8080 max_fails=1 fail_timeout=3s;
            server 4.3.2.2:8080 backup;
    }

    upstream node2 {
            server 4.3.2.2:8080 max_fails=1 fail_timeout=3s;
            server 4.3.2.1:8080 backup;
    }

    server {
            listen 80;
            location / {
                proxy_pass http://$sticky_host;
            }
    }
}

只需要提取cookie,转发对应的upstream,就实现了sticky session。
这里使用了map将AUTH_SESSION_ID的最后一部分提取到变量$sticky_host里,然后作为proxy_pass的值。