Sentry onpremise迁移踩坑

其实最想要的是保留project配置,这样客户端的DSN配置统统不用改,报错数据倒是可以不要。

有文章已经给出了配置迁移教程:https://medium.com/@avigny/sentry-on-premise-migration-dc0e42f85af4

不过我在过程中遇到了奇怪的错误

root@b06d49e21a01:/# sentry import data/files/sentry_export.json                               [832/1970]
00:27:04 [WARNING] sentry.utils.geo: settings.GEOIP_PATH_MMDB not configured.
/usr/local/lib/python2.7/site-packages/cryptography/__init__.py:39: CryptographyDeprecationWarning: Pytho
n 2 is no longer supported by the Python core team. Support for it is now deprecated in cryptography, and
 will be removed in a future release.
  CryptographyDeprecationWarning,
00:27:08 [INFO] sentry.plugins.github: apps-not-configured
Traceback (most recent call last):
  File "/usr/local/bin/sentry", line 8, in <module>
    sys.exit(main())
  File "/usr/local/lib/python2.7/site-packages/sentry/runner/__init__.py", line 166, in main
    cli(prog_name=get_prog(), obj={}, max_content_width=100)
  File "/usr/local/lib/python2.7/site-packages/click/core.py", line 722, in __call__
    return self.main(*args, **kwargs)
  File "/usr/local/lib/python2.7/site-packages/click/core.py", line 697, in main
    rv = self.invoke(ctx)
  File "/usr/local/lib/python2.7/site-packages/click/core.py", line 1066, in invoke
    return _process_result(sub_ctx.command.invoke(sub_ctx))
  File "/usr/local/lib/python2.7/site-packages/click/core.py", line 895, in invoke
    return ctx.invoke(self.callback, **ctx.params)
  File "/usr/local/lib/python2.7/site-packages/click/core.py", line 535, in invoke
    return callback(*args, **kwargs)
  File "/usr/local/lib/python2.7/site-packages/click/decorators.py", line 17, in new_func
    return f(get_current_context(), *args, **kwargs)
  File "/usr/local/lib/python2.7/site-packages/sentry/runner/decorators.py", line 30, in inner
    return ctx.invoke(f, *args, **kwargs)
  File "/usr/local/lib/python2.7/site-packages/click/core.py", line 535, in invoke
    return callback(*args, **kwargs)
  File "/usr/local/lib/python2.7/site-packages/sentry/runner/commands/backup.py", line 15, in import_
    for obj in serializers.deserialize("json", src, stream=True, use_natural_keys=True):
  File "/usr/local/lib/python2.7/site-packages/django/core/serializers/json.py", line 88, in Deserializer
    six.reraise(DeserializationError, DeserializationError(e), sys.exc_info()[2])
  File "/usr/local/lib/python2.7/site-packages/django/core/serializers/json.py", line 81, in Deserializer
    objects = json.loads(stream_or_string)
  File "/usr/local/lib/python2.7/json/__init__.py", line 339, in loads
    return _default_decoder.decode(s)
  File "/usr/local/lib/python2.7/json/decoder.py", line 367, in decode
    raise ValueError(errmsg("Extra data", s, end, len(s)))
django.core.serializers.base.DeserializationError: Extra data: line 1 column 2 - line 9340 column 1 (char
 1 - 184186)
Exception in thread raven-sentry.BackgroundWorker (most likely raised during interpreter shutdown)

仔细看原来是导出的sentry_export.json文件混入了其他的stdout内容:

07:14:23 [WARNING] sentry.utils.geo: settings.GEOIP_PATH_MMDB not configured.
07:14:55 [INFO] sentry.plugins.github: apps-not-configured
>> Beginning export
...
>> Skipping model <Broadcast>
>> Skipping model <CommitAuthor>
>> Skipping model <FileBlob>
>> Skipping model <File>
>> Skipping model <FileBlobIndex>
>> Skipping model <DeletedOrganization>
>> Skipping model <DeletedProject>
>> Skipping model <DeletedTeam>
...

把这些多余的行删除后,才成为合法JSON数据。

然而继续执行又遇到了sql错误:

  File "/usr/local/lib/python2.7/site-packages/click/core.py", line 722, in __call__          [633/2067]
    return self.main(*args, **kwargs)
  File "/usr/local/lib/python2.7/site-packages/click/core.py", line 697, in main
    rv = self.invoke(ctx)
  File "/usr/local/lib/python2.7/site-packages/click/core.py", line 1066, in invoke
    return _process_result(sub_ctx.command.invoke(sub_ctx))
  File "/usr/local/lib/python2.7/site-packages/click/core.py", line 895, in invoke
    return ctx.invoke(self.callback, **ctx.params)
  File "/usr/local/lib/python2.7/site-packages/click/core.py", line 535, in invoke
    return callback(*args, **kwargs)
  File "/usr/local/lib/python2.7/site-packages/click/decorators.py", line 17, in new_func
    return f(get_current_context(), *args, **kwargs)
  File "/usr/local/lib/python2.7/site-packages/sentry/runner/decorators.py", line 30, in inner
    return ctx.invoke(f, *args, **kwargs)
  File "/usr/local/lib/python2.7/site-packages/click/core.py", line 535, in invoke
    return callback(*args, **kwargs)
  File "/usr/local/lib/python2.7/site-packages/sentry/runner/commands/backup.py", line 16, in import_
    obj.save()
  File "/usr/local/lib/python2.7/site-packages/django/core/serializers/base.py", line 205, in save
    models.Model.save_base(self.object, using=using, raw=True, **kwargs)
  File "/usr/local/lib/python2.7/site-packages/django/db/models/base.py", line 838, in save_base
    updated = self._save_table(raw, cls, force_insert, force_update, using, update_fields)
  File "/usr/local/lib/python2.7/site-packages/django/db/models/base.py", line 905, in _save_table
    forced_update)
  File "/usr/local/lib/python2.7/site-packages/django/db/models/base.py", line 955, in _do_update
    return filtered._update(values) > 0
  File "/usr/local/lib/python2.7/site-packages/django/db/models/query.py", line 667, in _update
    return query.get_compiler(self.db).execute_sql(CURSOR)
  File "/usr/local/lib/python2.7/site-packages/django/db/models/sql/compiler.py", line 1204, in execute_
sql
    cursor = super(SQLUpdateCompiler, self).execute_sql(result_type)
  File "/usr/local/lib/python2.7/site-packages/django/db/models/sql/compiler.py", line 899, in execute_s
ql
    raise original_exception
django.db.utils.IntegrityError: UniqueViolation('duplicate key value violates unique constraint "django_
content_type_app_label_model_76bd3d3b_uniq"\nDETAIL:  Key (app_label, model)=(sentry, groupresolution) a
lready exists.\n',)
SQL: UPDATE "django_content_type" SET "app_label" = %s, "model" = %s WHERE "django_content_type"."id" = 
%s

我一开始想删JSON里的数据,比如(sentry, groupresolution),搜索groupresolution可以找到对应的对象。可是删了几十条,还是报错,没见有结束的迹象……

换个思路,我把新sentry的数据库清了吧。先找到postgresql对应的容器id,docker exec -it <container_id> bash进入,psql -U postgres到数据库shell,然后`TRUNCATE TABLE django_content_type`

又报错:

postgres=# TRUNCATE TABLE django_content_type;
ERROR:  cannot truncate a table referenced in a foreign key constraint
DETAIL:  Table "django_admin_log" references "django_content_type".
HINT:  Truncate table "django_admin_log" at the same time, or use TRUNCATE ... CASCADE.

外键约束。。。那没办法了,直接TRUNCATE TABLE django_content_type CASCADE;

NOTICE:  truncate cascades to table "django_admin_log"
NOTICE:  truncate cascades to table "auth_permission"
NOTICE:  truncate cascades to table "auth_group_permissions"
TRUNCATE TABLE

再次导入,成功了。
Manjaro Lysia 20.0.3 new swapfile

If you generate a new swapfile, it usually will get a new uuid. But /boot/grub/grub.cfg will not be updated automatically.

So next time you boot, error like this will occur:

ERROR: resume: hibernation device ‘7a5aa742-6133-41bd-8dc5-d72d4790d364’ not found

In this case you will have to wait a long time to get into GUI or not able to login at all.

What you should do is to edit /etc/default/grub, change GRUB_CMDLINE_LINUX_DEFAULT="quiet resume=UUID=<your new swap UUID>", and then run sudo update-grub to update /boot/grub/grub.cfg.

Check if resume=UUID=<new swap UUID> in /boot/grub/grub.cfg are set correctly.

You should also check swap UUID in /etc/fstab.

Use sudo blkid to find UUID of your devices.

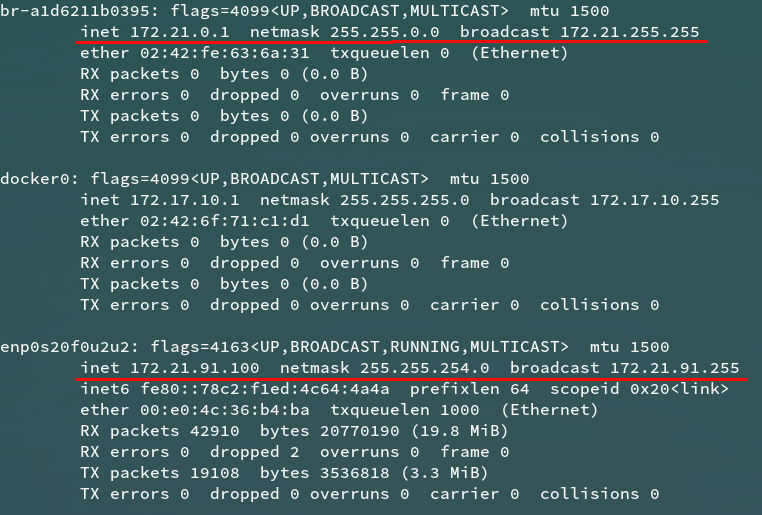
网络变化,docker网桥与网卡的新网段冲突

搬新办公室之后,网卡DHCP拿到的IP发生了变化,导致一个自动生成的网桥与网卡网段有冲突,结果互联网可以上,而内网其他服务器都不能访问,每次重启电脑都要手动把网桥禁用才能正常访问内网开发服务器。

出现这种情况的原因是在老的网络环境使用过docker-compose创建了网络,在新的网络环境里,老的docker网络并不会自动重新生成网段来避免网络冲突。

使用docker network rm a1d6211b0395把冲突的网络删除,让docker-compose未来启动时自动重建网络即可。

a curious case of Flask-SocketIO

As a fullstack developer (do it all alone coding monkey), one day you are assigned with a task that requires realtime communication between browser and server.

So you typed ‘flask websocket’ in Google. The first page was filled with Flask-SocketIO. So you pip installed it and inside create_app, you did what the documentation said:

socketio.init_app(app)

then you run socketio.run() and open the example html came along with the chat demo.

To your surprise, the browser connected and was sending a ping in one second interval. But the server seemed like it was not receiving nor sending anything after WebSocket connection was established.

You spent several hours trying to find out why. Including all sorts of debug parameters:

socketio.init_app(app, engineio_logger=True)

and

socketio.run(
    app,
    host='0.0.0.0',
    port=5000,
    debug=True,
    use_reloader=True,
    log_output=True
)

But to no avail.

All of a sudden, you remembered that sometimes plugins do interfere with one another. So you moved your socketio.init_app(app) down to the bottom of the blob of ‘init_app’ from many many plugins.

And then, Flask-SocketIO started to spew ‘pongs’ in one second interval like they said in the demo.

You have no idea why but it worked.

FML

nginx sticky session

Sticky session,一般翻译作会话保持,其实就是说负载均衡能做到这一点:一个用户第一次访问服务,可能是随机分配的一台upstream服务器提供服务,而这个用户的后续请求都发往第一次服务的这台机器。这样做有很多好处,比如可以提高用户数据的缓存命中率、数据一致性更容易保证等等。

Nginx本身就有一些会话保持的方法,比如ip_hash,根据请求的ip地址来哈希分配。但有些情况ip_hash是失效的,比如我们使用公司的网络,出口ip可能全都一样,这样我们访问一个外部服务其实全哈希到同一台服务器,直接失去了负载均衡的意义。Nginx Plus也有这个功能,看起来很美,唯一缺点是花钱。也有免费的sticky modulesticky module ng,问题是Nginx要重新编译,不太方便,也可能是一些新的大坑,时间黑洞。

其实我们用各种linux发行版维护的免费版Nginx配合上游服务器也能实现同样的功能。

原理很简单:应用服务器在用户请求里写入一个约定好的cookie,带上服务器的身份信息,比如主机名。Nginx先配置好{身份信息:地址}的映射关系,拿到请求后,在转发前提取此cookie,根据身份信息转发对应的upstream。

假设我们有两台应用服务器:node1, node2。cookie长这样 Name: AUTH_SESSION_ID, Value: a2c1dac1-5b50-4d1a-ba8f-f838222bd176.node1,其中node1指示了cookie来自哪台主机。这是Keycloak的cookie格式,我复用一下,其实你完全可以自己定义一种,就免了下面的正则表达式提取。

Nginx配置文件

http {
    map $cookie_AUTH_SESSION_ID $sticky_host {
        default default_upstream;
        ~^[^\.]*\.(?<node>.*) $node;
    }

    upstream node1 {
            server 4.3.2.1:8080 max_fails=1 fail_timeout=3s;
            server 4.3.2.2:8080 backup;
    }

    upstream node2 {
            server 4.3.2.2:8080 max_fails=1 fail_timeout=3s;
            server 4.3.2.1:8080 backup;
    }

    server {
            listen 80;
            location / {
                proxy_pass http://$sticky_host;
            }
    }
}

只需要提取cookie,转发对应的upstream,就实现了sticky session。
这里使用了map将AUTH_SESSION_ID的最后一部分提取到变量$sticky_host里,然后作为proxy_pass的值。

unknown collation utf8mb4_0900_ai_ci

如果使用了 mysql-connector-python 8.0.17 ,而你的mysql服务器并不是8.0,那么你可能会遇到这个错误。之前我们的解决方法是把版本退回到8.0.16,现在官方给出了真正的原因

解决办法是把连接串的参数charset=utf8mb4改为charset= utf8mb4_general_ci 。原因是从8.0.17开始,默认的utf8mb4其实会使用utf8mb4_0900_ai_ci 字符集编码,虽然mysql 8.0之前的服务器并不支持这个最新的编码。

使用企业微信 (Identity Provider) 登录Keycloak (Identity Broker)

Keycloak是一套不错的IAM解决方案,它能够实现SSO,还可以作为Identity Broker集成多种第三方登录方式。Keycloak自带常见的Social Login,包括Google、GitHub、Twitter等等,但是没有微信和企业微信。鉴于我司企业微信的广泛使用的事实, 在实现企业SSO服务过程中我们决定将其集成为主要第三方登录方式,基于Keycloak 6.0.1进行企业微信Identity Provider研发,本文记录了个人在此中积累的一点经验。本人主力语言并不是Java,文章有错误或您有更佳方案,请指正。

首先感谢https://gitee.com/jyqq163/keycloak-services-social-weixin 这个项目,指路明灯!企业微信与微信差异不大,我们做些改造即可。

查看项目里的WeixinIdentityProvider类,我们发现它extends AbstractOAuth2IdentityProvider;,这个org.keycloak.broker.oidc.AbstractOAuth2IdentityProvider就是我们要实现的目标。

其实这个类不完全是问题的关键,因为你上来直接去看,不一定看得懂,所以问题的关键是要熟悉OAuth2的基本概念和常用认证流程。比如,Authentication和Authorization的区别是什么?OAuth2和OpenID Connect(OIDC)是什么关系?OAuth2里面Resource Owner是什么,Client是什么,Identity Provider是什么,User Federation又是怎么回事?常见的Authorization Grant有几种?分别是什么?哪两种比较常见?

超过一半答不上来的话,没有捷径,请老老实实先翻资料:https://tools.ietf.org/html/rfc6749 。不过说实话RFC文档并不适合阅读,你应该找其他面向人类的资料,比如http://gen.lib.rus.ec/book/index.php?md5=3707B342B22E5C059B2F17FEF8AB7D2F 。But when in doubt, read RFC。

另外你还要熟悉企业微信并不是100%符合标准的”OAuth2″认证流程,比如单独获取的、7200秒有效的、需要你缓存的access_token并不是 OAuth2 标准里的用户级access_token,而是全局的,它不是在认证第二步用code换回的,而是用corpId(clientId)和corpSecret(clientSecret)直接获取,是相对独立的流程。更多内容可参考https://zhuanlan.zhihu.com/p/36320213

有了清晰的概念之后就好办了。SSO一般使用流程是:用户想使用一个业务,使用客户端(一般是浏览器)访问业务服务器,业务服务器检查用户当前session状态,如果没有或过期,则向SSO服务检查用户是否已统一登录。如果SSO已登录则直接刷新自己的session,为用户提供服务;如果SSO未登录,则将用户重定向到SSO登录页。

此时用户有多种登录方式可选,我们这里是:直接登录Keycloak,或企业微信登录。用户选择企业微信登录后,Keycloak作为broker向向企业微信请求access_token,再向authorize endpoint发送指定appid、redirect_uri、response_type(grant type)、scope等参数的认证请求(链接/扫码),企业微信返回code后,再次利用access_tokencode请求用户身份信息,还可进一步获取用户详细信息,用这些信息查询或建立新用户,完成登录。最后重定向回到业务服务器,业务服务器即可向用户提供服务。

回到代码,我们现在的任务就是仿照WeixinIdentityProvider类,实现一个WechatWorkIdentityProvider类,让Keycloak认得企业微信。

从认证请求开始,方法名叫performLogin,看它基类的介绍Initiates the authentication process,这就是social login的起点。参考https://work.weixin.qq.com/api/doc#90000/90135/91022网页授权登录(这种方式在企业微信内打开有效,此外还有另一种二维码方式,可在企业微信外部打开。因此你可以根据user agent是否包含wxwork字样,生成不同的授权链接,余下的步骤是一样的),我们不难将链接的构造方法createAuthorizationUrl改造为适合企业微信的。然后Response.seeOther(authorizationUrl).build()其实就重定向、访问了企业微信授权接口,此接口带着codestate参数回调你指定的redirect_uri

redirect_uri按照是自动配置的,我们现在无需过多关注,需要关注的是其处理逻辑,是在内部类Endpoint里的authResponse方法,重点关注authorizationCodecode这个参数,还有真正获取、设置用户信息的getFederatedIdentity方法。根据企业微信文档,你需要拿code再加上单独获取的access_token来获取访问用户身份https://work.weixin.qq.com/api/doc#90000/90135/91023 ,取得UserId。随后还能进一步获取用户在企业微信通讯录里的详细信息:https://work.weixin.qq.com/api/doc#10019 。在extractIdentityFromProfile方法中,你可以将信息填入BrokeredIdentityContext,这样我们的扩展插件经手的工作就结束了,剩余的交给Keycloak处理。

注意企业微信比微信多了一个AgentId属性,Keycloak修改前端页面就能直接添加字段, 使用的是angular框架。我们可以在/keycloak-services-social-weixin/templates/realm-identity-provider-wechat-work.html里找到clientId属性,具体是

            <div class="form-group clearfix">
                <label class="col-md-2 control-label" for="clientId"><span class="required">*</span> {{:: 'pc-weixin-appid' | translate}}</label>
                <div class="col-md-6">
                    <input class="form-control" id="clientId" type="text" ng-model="identityProvider.config.clientId" required>
                </div>
                <kc-tooltip>{{:: 'social.client-id.tooltip' | translate}}</kc-tooltip>
            </div>

其实对应到企业微信就是CorpID。复制一段,把信息全改为AgentID

            <div class="form-group clearfix">
                <label class="col-md-2 control-label" for="agentId"><span class="required">*</span> {{:: 'Agentid' | translate}}</label>
                <div class="col-md-6">
                    <input class="form-control" id="agentId" type="text" ng-model="identityProvider.config.agentId" required>
                </div>
                <kc-tooltip>{{:: 'social.agent-id.tooltip' | translate}}</kc-tooltip>
            </div>

这就为AgentID找到了保存的地方。可以在Provider里调用。内部怎样调取AgentId不具体细说了,看看源码,扩展OAuth2IdentityProviderConfig增加getAgentId方法,很容易的。

最后修改pom.xml文件,把项目名等信息改为 wechat-work ,调用mvn clean package把项目编译为独立Jar包,放入 KEYCLOAK_HOME/providers/(不存在就创建),把templates/*放入 KEYCLOAK_HOME/themes/base/admin/resources/partials/,重启Keycloak服务就可以在Identity Providers里找到wechat-work,新建,填写CorpID, AgentID, CorpSecret,随后在首页就会出现WechatWork登录渠道。

虽然文档异常缺乏,mailing list提问也没人理,Wildfly依赖关系花了一个星期才弄明白,但为Keycloak做功能扩展确实算很容易了,插件式的集成方式完全不用侵入其源码,这一点让人觉得选Keycloak还是正确的。

源码在此: https://github.com/kkzxak47/keycloak-services-social-wechatwork

PS: 为了缓存企业微信的access_token,我直接使用了org.infinispan.Cache,因为Keycloak自己就使用了这个缓存组件,我就不用再增加依赖了。但最后还是遇到了依赖问题Uncaught server error: java.lang.NoClassDefFoundError: org/infinispan/configuration/cache/ConfigurationBuilder,原本在项目pom.xml里添加了org.infinispan只在编译时有效,最后部署时,还是要在KEYCLOAK_HOME/modules/system/layers/keycloak/org/keycloak/keycloak-services/main/module.xml里的dependencies里添加依赖,module.xml文件最后长这样:

<module name="org.keycloak.keycloak-services" xmlns="urn:jboss:module:1.3">
    <properties>
        <property name="jboss.api" value="private"/>
    </properties>

    <resources>
        <resource-root path="keycloak-services-6.0.1.jar"/>
    </resources>

    <dependencies>
        <module name="org.infinispan" services="import"/>
        <module name="org.keycloak.keycloak-common" services="import"/>
    ...
    </dependencies>
</module>

ansible-runner的用法

虽然ansible是Python项目,但在Python里调用ansible并没有想象中那么简单,很繁杂。ansible-runner是个不错的项目,提供了调用ansible的快捷方式。但文档异常缺乏,下面举两个例子,分别是调用module和调用ansible-playbook。

调用module非常简单,比如ansible all -m shell -a 'cat /proc/cpuinfo | grep processor | wc -l'直接写成

r = ansible_runner.run(inventory=inventory, host_pattern="default", module='shell', module_args="cat /proc/cpuinfo | grep processor | wc -l")

inventory就是个字符串,可以使用ini格式,比如:

"""[default] 
host_name ansible_host=1.2.3.4 ansible_port=22 ansible_user=root ansible_password=123456"""

inventory也可以通过跳板机,注意要安装sshpass

"""[default]
host_name ansible_host={ip} ansible_port={port} ansible_user={user} ansible_password={passwd} ansible_ssh_common_args='-o ProxyCommand="sshpass -p {jump_server_passwd} ssh -W %h:%p  {jump_server_user}@{jump_server_ip} -p {jump_server_port} """

调用ansible-playbook

r = ansible_runner.run(
                private_data_dir=tmpdir,
                inventory=inventory,
                playbook=playbook_path,
                host_pattern="default",
                # quiet=True,
                extravars={"timeout": 300, 
                           "lock_timeout": 120,
                           "service": 'test'
                           },
                envvars={"ANSIBLE_HOST_KEY_CHECKING": False}
            )

private_data_dir指向一个临时目录,可以用tempfile.TemporaryDirectory。

playbook_path是ansible-playbook的文件路径。host_pattern跟inventory保持一致为’default’即可。

quiet设为True可以屏蔽详细的日志信息。

extravars用来指定ansible-playbook内部的变量。

envvars就是附加的环境变量。

这两个例子已经覆盖了大部分使用场景,更详细的参数比如ssh private key登录可以看官方文档

Python引用计数

Python里object都会有一个属性:被引用次数,垃圾回收的时候会用到,最简单的情形是引用计数=0,直接回收掉即可。其他复杂些的情形,如循环引用,则需要通过标记-清除和分代回收机制来进行。
sys.getrefcount(obj)可以查看一个object被引用的次数。有趣的是它给出的结果总是比实际数目多1,原因是调用函数时也增加了一次引用。
其文档https://docs.python.org/3.7/library/sys.html#sys.getrefcount是如此描述的:

sys.getrefcount(object)
Return the reference count of the object. The count returned is generally one higher than you might expect, because it includes the (temporary) reference as an argument to getrefcount().

“generally one higher”,是说一般情况下会多一,但特殊情况不会多?否则直接减一然后返回实际值就行了?
值得研究一下。